Monday, March 1, 2010
Flourishes Timeless Tuesday Challenge(FTTC56)!
Sunday, February 28, 2010
The Grande Finale
Here is my color palette. The unmarked green marker is YG03 and the unmarked white cap is a custom color I created using YG03 and colorless blender to get a green to use for a base color.

After stamping my image on Flourishes Classic White Card Stock in Memento Tuxedo Black ink, I colored all of the flowers with my base color R0000. Just small circular motions coloring the entire flower with an even layer. Get that paper wet! If you are using a good card stock you can get the paper good and wet with the markers, so it shows through the back, and not worry about ruining it. Of course if you really soak it you run the risk of the stamped lines bleeding. Practice on some scraps so you know you have the right consistency.
The first shading color I add is R81. I color almost the entire petal leaving just the edge with the R0000 showing. You can see the subtle shading here. Don't forget to chose your light direction. I chose to have my light source coming from the front, therefore highlights will hit the centers and top edges of the petals.
 Moving on to the next darker shade, I use R83 coloring each petal from the bottom to just below where I ended with the last color. Here I colored only the top full rose and rose bud so you could see the difference where the new color was added.
 Following the same strategy as in with the first two colors add the next darker shade R85. I again add this from the bottom of each petal moving up to just below the previous color layer. If you look close you can see four color layers: R0000 base, R81, R83, R85. Can you see it?!!
 Now....take that R0000, your base color, and in small circular motions blend the entire flower. This will soften all of the lines and make them blend together nicely. This is where you realize that if you haven't used a good quality card stock, such as I have used here, that your paper may start to pill or your lines will bleed. It will look like the image below.
 I like to really deepen the shadows, which brings out the light even more in the flowers. Here I used R89 in all of the shadows. It's a very strong color and you have to be very careful adding it or you run the risk of putting down too much and you can't take it away...
I use just the very tip of the marker and with a very light touch just dab the darker color where I want it. With these gorgeous images placing the shading is made easier as it's indicated on the image where all of the dark lines are. Where the most lines are is where you will place the darkest colors, like in between the two large flowers. Adding that dark color really adds to the drama and make the image pop!
 Okay, lets blend one more time. This time I use R83 which was my mid range pink and go over the petals in circular motions to blend the darkest color in, but not going all the way to the end as I don't want to lose my highlights. I am just blending the R83, R85, and R89 together.
 And for the very last time I use R0000 to go over the entire flower blending in small circular motions to bring everything together and smooth out any rough edges.
 I do the leaves exactly the same way as I did the flowers. I use 3 greens. The first layer is a custom blend I made using YG03 + Colorless blender in a 3 to 1 ratio. I use this to base the leaves. I then add YG03 around the outer edges leaving the centers with just the base color. Next I used YG17 to add deeper shading around the outside, but not covering up all of the YG03 I laid down in the previous step. Lastly I use the base color to go over the entire leaf blending all three shades together.
 And here is my finished card. I've used this gorgeous silk ribbon from Flourishes, Basic Grey paper from the Sugared collection, and Prism card stock for matting and a card base.
 I hope you've enjoyed this tutorial and my time here in the Limelight. I have had a wonderful time and great experience and I appreciate every wonderful comment that I have received! Thank you so much for visiting me here! Have a wonderful weekend!
Wednesday, February 24, 2010
We've really moved!
Hop on over to our NEW BLOG to see our new stamp set in honor of her special day and help her take a trip back in time!
It's a Celebration!
Introducing.....
Let them Eat Cake!
Becky did have a few words to share about the inspiration behind this beautiful set!
Much to my mother's chagrin, I am a tomboy through and through. I think the last time I wore pink was my wedding and it was with a great deal of protest. Naturally, anything girly or frou-frou just doesn't resonate with me. When Flourishes asked me to create this particular stamp set, I had just seen the Marie Antoinette movie with Kirsten Dunst (and now you're probably wondering WHY I watched that movie, but that's an entire novella all unto its own). Suffice it to say I was feeling a bit "inspired" after seeing the story about the life of this ill-fated queen. Her battle cry, "Let them eat cake!" motivated these designs and I hope you enjoy stamping with them as I much as I did creating them. Now if I could only talk Flourishes into some sort of camo stamp set ...
Hhhmmm. Camo? Not sure about that one Becky! :-) Being the good sport she is, Becky even made a card for Jan to send along cyber well wishes for a great year! Isn't it darling?
If you'd like a peek at this set in the store -- it's there for the taking! Just click HERE to see.
Get ready! Tomorrow, it's the Senior Design Team's turn to wish Jan a fun-filled birthday! We plan to hop along with fun and games that even YOU can participate in! So, hop on back and see what we have in store for Jan!
Tuesday, February 23, 2010
We've made the move!
Also, if you follow us on Google Reader, there is an icon on the left side of the blog asking you to Join This Site with Google Friend Connect. We'd love it if you clicked on the Join this Site button. It will keep your Google Reader subscription running smoothly, so you never miss the happenings at Flourishes! We will also be offering a little candy -- and only followers/friends will be eligible! So click and join us today!
Monday, February 22, 2010
Flourishes Timeless Tuesday Challenge(FTTC55)!
Iwona is using A Year of Flowers 2 stamp set. Iwona is a landscape artist and loves all kinds of flowers. She thinks it would be impossible to pick one favorite flower. However, for her card she did need to narrow down the choices. She chose the Morning Glory because it is one of her many favorites. With today's challenge to use flowers, Flourishes definitely offers many gorgeous floral images to choose from. Iwona watercolored the Morning Glories. She added Inkssentials White gel for highlighting. She stamped her image on a textured paper that makes the image look like it was colored on canvas. I love that effect! Iwona added some sewing to the edges and added touches of lavendar pearls to the center of the flowers. She finished her gorgeous card with a lush burgandy satin bow! Beautifully done, Iwona! Please check out Iwona's blog for more card details!
Silke Ledlow, Maki Jones, and Barbara Anders
FTTC54 Winner!
Chosen by Random Integer Generator
Here are your random numbers: 11
Timestamp: 2010-02-23 03:10:55 UTC
Congratulations, Caryl P!!!
Stamps and Stitches
Please pm me at SCS under gbedwright for your coupon code!
The Friends of Flourishes blog design team are bringing you exciting and different challenges each week. Everyone can PLAY and anyone can WIN! Each week Flourishes gives away a store gift certificate for $10 to the lucky random draw participant. In addition to this, Flourishes also gives away a random monthly gift certificate for $10 to one lucky monthly challenge winner. So, if you did not get a chance to finish all of the challenges during the month, you still have a chance to win. Just link your card with Mr. Linky for each challenge completed! We also have the Flourishes Timeless Tuesday blog button to sport on your blog! If you need the code, check here.
- Anyone can play whether you have Flourishes stamps or not. Of course, if you have Flourishes stamps, by all means, use them.
- Use keyword code FTTC55 when linking to SCS or public gallery.
- Be sure to use the Mr. Linky to be eligible for the gift certificate drawing!
- If you use either your blog link or online gallery, please give an active Flourishes Blog link.
- By all means combine this challenge with other blog challenges.
- The challenge runs from Tuesday, 12:01 am until Monday at 6 pm EST
- Enjoy yourself!!!
Our New Website: Please Be Patient
Hello Everyone! This is Marcella Hawley, and in addition to designing images for your stamping pleasure (he he!)—I also designed Flourishes brand new website. Hopefully you can bear with us for a few more hours. When a website moves to a new host,it can take a while for all of the elements and links to switch over. Some will happen automatically and many we will need to update manually (especially those in old blog posts).
The "SHOPPING" aspect of Flourishes may take a bit of time to work properly for everyone. For example, I am seeing everything as it is supposed to be, but some folks may not have everything working smoothly. The internet takes a while for new information to "populate" to web servers throughout the country and the world.
I will report back when things seem to be on the "up and up" throughout the site! Thank you so much for your patience, and for visiting us today! ~marcella
As Marcella mentioned, we are in a state of transition. But the good thing to note is our new website comes with a brand new blog that is directly tied to our store and tutorial library! Fun stuff! So, head on over to www.flourishes.org and check it all out! If you currently subscribe to our blog, you will want to update the RSS feed service that you use i.e. Feedburner, Feedblitz or Google Reader so that you don't miss out on any of the action!
Flourishes is in the Stamp It Cards Spotlight!
Sunday, February 21, 2010
Ready for Spring

I started by altering a plain lined notebook with a piece of paper from Imaginisce. I used some luscious purple silk ribbon which matched wonderfully with the purple Prism cardstock I used to mat all of my images. The images are all from the set Sweet Violets. I used the larger image for both the center of the journal and the bookmark and the smaller image for the plant marker. All are stamped on Flourishes white card stock and colored with Copic markers. On both larger images I used a touch of purple and green Stickels for a tiny bit of sparkle and depth and shaded around the images with Prismacolor pencils and odorless mineral spirits. They were all cut out using Nestabilities dies and inked around the edges with Distress Ink in Antique Linen.
Here is a close up of the front cover. The dp has a faded script design running across it giving it an aged feel. I stamped and cutout an additional leaf and used it and buttons to adorn a computer generate label I made for the journal. You can also see some of the sparkle at this angle.

This is the plant marker I created. I used a craft stick that I stamped violets onto. I knew that bag of craft sticks would come in handy some day! I'd better start making more markers...

And finally I created a bookmark to keep my place in my journal just in case my dirty fingerprints don't show me the way ;) Again I used that luxurious silk ribbon! Ooh, I love this stuff! It makes the most stunning bows too!
 Grouped together this makes a wonderful gift set...and I have a wonderful neighbor this would be perfect for, unless of course I keep it for myself, lol! Have a great weekend!
Friday, February 19, 2010
Our Web Store Is Getting A Facelift!
What does that mean for you the customer? Our store will be down for up to 48 hours as we transfer inventory and put the final touches into play. We will reopen for our Grand Opening on Monday, February 22nd. Get ready for a whole new shopping experience that comes complete with a brand new gallery for inspiration, a tutorial library and more!
See you Monday at.... www.flourishes.org
Thursday, February 18, 2010
Copic Extras!
Hi it's Christine here with you today. I thought it would be fun to give you some new ideas for how to use your Copics today. Some you may have seen, and some that might be new to you. I'll be showing you 4 different techniques with Copics today so hang on....it's a long post :)
The Colorless Blender Pen
This is one fantastic little essential in EVERY Copic owners Collection. When I look at it - it's really not a blending tool, per say...but more-so a color remover. And when you think of it that way, it has SO many applications. You probably all know that it can remove ink you've "spread too far over the edges", but it can also add details into your design where you want them.
Below is a cute little purse image from the Think Pink - Fight Like a Girl set. It's a good example for this technique because it has some open space. I colored it with the Tea Rose Copic Collection from the store on our Flourishes Classic White paper - specifically designed for use with Copics.
Copic Pointillism
When I was in High School we learned a technique with a fine point black marker called Pointillism. You create depth, light and shadow in your design by making fine even dots with your black pen. That same technique can be applied to copic markers with a light hand as well, and the way Flourishes sells the Collections in the store is just perfect for this technique. I started with the Spring Greens Collection and the very fun tree and swing in the Swing Set . Initially you add dots randomly to the design in areas that you want the lightest colors to show. I work from lightest to darkest. Remember light advances, dark receeds.
And here it is after I've gone back and added some more YG00 for a softer look.
Then I used these supplies below: blending solution (essentially what you would use to refill your blender pen - I got it at my Copic Certification course, but I know retailers sell it) and my rag. I chose an old washcloth because of the texture, so whatever type of rag you use will give you a different effect.
What you want to do then is dampen a corner of the rag with blending solution and then dab lightly over your colored image. The blending solution will "remove" color from your image in the texture pattern on the rag. I did this several times to get the effect I wanted. It is very subtle but adds the feeling of texture, or in this case almost the feeling of a tie-dyed shirt.
Wednesday, February 17, 2010
Just in case you missed it! ;-)
Because of it's unusual shape, I recently did a tutorial on my blog on how to use it. I thought we'd showcase that "how to" here... just in case you missed it! First things first, here's a peek at what the stamp looks like on the block. See the criss cross pattern?

After inking it up with black ink, this is how it stamps....
 The fun thing is, once you line the tea rose background up, you get a pattern that could repeat from here to eternity!
 And, after lining it up and stamping, then the fun begins with coloring and creating! Here's a peek at my finished card.I also used elements from the new Let's have Tea set! If you'd like to know more about the card mechanics, you can click HERE to see.
 Remember, Flourishes New Release Bundle featuring all four stamp sets is on special for one more day only! This bundle combines all four sets into one package price which is 10% less than if you were to buy each set individually! Great deal!
 Monday, February 15, 2010
Flourishes Timeless Tuesday Challenge (FTTC54)!
It is time for Flourishes Timeless Tuesday Challenge(FTTC54)! Thanks so much for playing along with us last week in the easel card challenge!
Let's go check out what Dee created with the "All About Me" challenge!
Dee is using Sweet Violets and Waterlilies stamp sets. Dee used Flourishes Classic White cardstock. She colored the image using Flourishes Copic Color Collection in Crocus, Lilac, and Evergreen. I love her fancy punched border frame accenting the deeply rich colored waterlily. Some cut work detailing and dimension makes everything just pop! She layered the waterlily with some basicgray dp, added a piece of sheer ribbon, and a metallic cording bow, and this gorgeous card was complete. Beautifully done, Dee!
Silke Ledlow, Maki Jones, and Barbara Anders
FTTC53 Winner!
Chosen by Random Integer Generator
Here are your random numbers: 9
Timestamp: 2010-02-16 01:00:32 UTC
Congratulations, Jackie!!!
m&m'sgrandma
Please pm me at SCS under gbedwright for your coupon code!
The Friends of Flourishes blog design team are bringing you exciting and different challenges each week. Everyone can PLAY and anyone can WIN! Each week Flourishes gives away a store gift certificate for $10 to the lucky random draw participant. In addition to this, Flourishes also gives away a random monthly gift certificate for $10 to one lucky monthly challenge winner. So, if you did not get a chance to finish all of the challenges during the month, you still have a chance to win. Just link your card with Mr. Linky for each challenge completed! We also have the Flourishes Timeless Tuesday blog button to sport on your blog! If you need the code, check here.
- Anyone can play whether you have Flourishes stamps or not. Of course, if you have Flourishes stamps, by all means, use them.
- Use keyword code FTTC54 when linking to SCS or public gallery.
- Be sure to use the Mr. Linky to be eligible for the gift certificate drawing!
- If you use either your blog link or online gallery, please give an active Flourishes Blog link.
- By all means combine this challenge with other blog challenges.
- The challenge runs from Tuesday, 12:01 am until Monday at 6 pm EST
- Enjoy yourself!!!
As always, thanks so much for stopping by and playing Flourishes Timeless Tuesday Challenge with us! Your comments are always greatly appreciated!
Your Flourishes Friends!
A New & Talented Designer on our Team!
So, without further ado, meet......

In preparation for her big reveal, we asked her to grab one of her favorite Flourishes sets and make a card. She whipped up this cheery Strawberries creation using a mix of Prismacolor Pencils and Copic markers. Isn't it just darling?
 We also asked Dawn to share a few thoughts and a little bit about herself too!
Hello everyone.. I am Dawn Burnworth and I am so excited to be joining this amazing design team. I have admired their work and creativity here at Flourishes.
I have always been a crafty girl.. I grew up in northern Illinois in a large family. I started out sewing one summer with my aunt.. She was such a huge influence in my life. I got so homesick and she was trying to keep my mind busy. I still find that when I am really stressed that a crafty type project eases my mind. She planted a seed in me that has been an important part of who I am.
I have a wonderfully supportive husband that puts up with my crafty "needs" and 5 great kids. I started stamping about 5 years ago. I remember uploading my first card to a challenge and how nervous I was. I have learned so much from all of the amazing talent out there.
I look forward to creating with the rest of the team and I am so happy to be stamping with Flourishes terrific stamps and thank you for this opportunity.
Thanks Dawn! We know it's going to be a fun ride and a blast getting to know you better!
Before we go, we wanted to share a darling card from one of our past DT members, Susan Roberts! She pulled out all the stops to make this footloose and fancy free card just in time for Mardi Gras!!!
 Susan's fun-filled card uses Flourishes Mardi Gras set! If you want to know more about this creation, just pay Susan a visit HERE.
Thanks for stopping by everyone! Betty and the gals will be back soon for another Timeless Tuesday Challenge!!
Sunday, February 14, 2010
I'm in distress
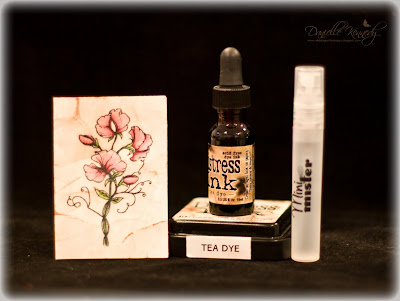
So here we have Distress Ink in Tea Dye, a re-inker and a pad, and a Mini Mister filled with water. I also use a disposable rectangle aluminum pan.
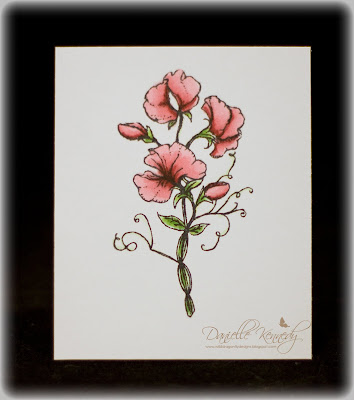
First I stamped my image with Memento Tuxedo Black dye ink (waterproof!) on Flourishes Classic White Card Stock and colored with Copic markers.
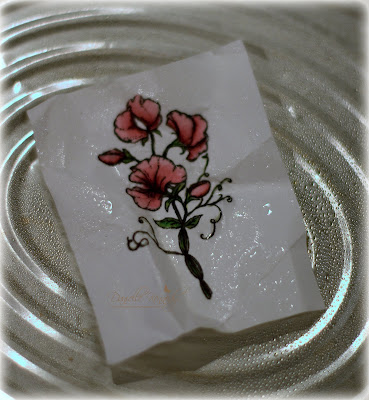
Next I crumpled it up! Yes, I said I crumpled it up. Go ahead...you can do it! Done? Not so bad, right? Scary yes, but it felt kinda good...I know it did.

Now pull out that pan I mentioned and place the image in the center and give it a good misting with water. And I mean good. I don't want your paper to be completely limp and fall apart, but you want the water to start soaking in so that the next step will flow easily. You can kind of see that there are tiny puddles in the folds of my paper.
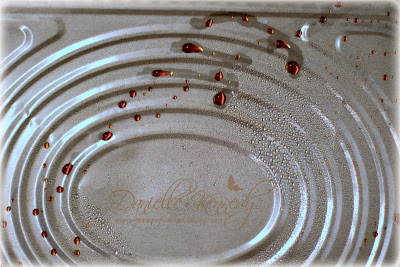
Okay, put the image aside just for a minute while you add a couple of drops of ink to the pan. Now mist those drops really well and swirl the pan around until you see blobs of diluted color like in the picture below.
This is a small image I am using. I have been known to add lots more ink and water, mixing colors, and really soaking my image. Even dropping the ink directly onto the paper and letting it run. That's really messy-but the results are gorgeous!
Okay, now if you thought crumpling was scary just see what you have to do now! Take the image and smoosh it face down into the ink puddles. Yes, smoosh and swirl, and keep picking it up and turning it over to make sure you have sufficient ink coverage. You might like the whole thing covered or just some of the image. I like to cover the whole thing! Add more ink if necessary until you like the results.
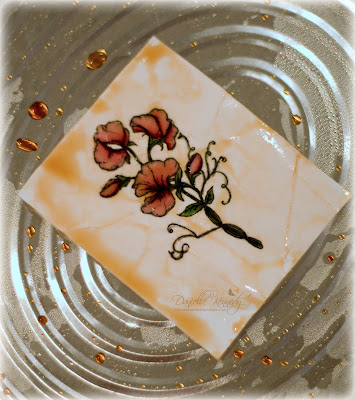
Now you just need to let the image dry. Or if you are like me and impatient, then you can hit it with the heat gun. I usually do that and then re-ink if I want to deepen the color. This is what it looks like dry.
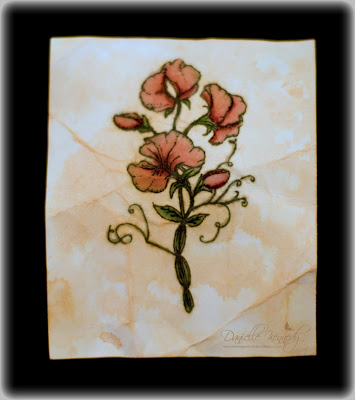
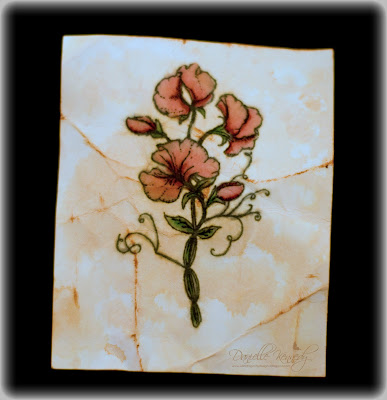
Okay, just one more scary step, I promise! I slightly crumple the image again, it will fold in all the same creases originally created, and then I lightly swipe the ink pad over the top just highlighting the folds.
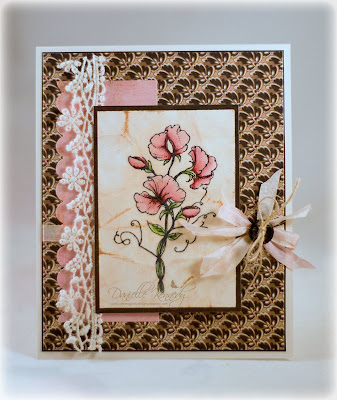
Now you are ready to use your image on a card or project. This is what mine looks like all finished.
This is really fun and the result are never the same twice! Give it a try!


