Sharon Johnson, who serves as Flourishes Senior Design team member, you may know by her SCS moniker and blog name No Time To Stamp, and for someone with that name she is incredibly prolific in her creations! For many years, Sharon's creative energy was spent at the sewing machine until 2000 when she attended a stamping workshop and realized how enjoyable this new hobby can be. She became a Stampin' Up demonstrator in 2006, and in addition to her Flourishes work she has been a member of the Dirty Dozen Design Team on Splitcoast Stampers and a guest designer for Score Pal. Her work has been published in Stampers' Sampler and Take Ten.
 Sharon’s art can be described in many ways, but the words that are often used are: stunning, beautiful and gorgeous. We knew we were in for a treat at Flourishes when she submitted this card, made with, of all things, the Cake Decorating 101 set. We never imagined a hat made from the set, and our jaws just dropped when we saw this beauty. This is representative of Sharon's creative energy. In addition to the hat, she also created a lamp, and of course, cakes!
 Much of her work has a lovely feminine look and I asked her about that.
If we were to visit your home, I envision it to be shades of blue, florals with a very feminine look with all sorts of handmade items throughout. Tell us about your home and work space.
My home -- oh, you couldn't be more wrong -- LOL!!! We are farmers, our house is over 100 years old, and there is nothing fancy or frilly about our home or the way we live. I am the only female in this house having one DH and 3 sons. This house functions the way it needs to for a farm house. We have NO carpeting, only hardwood and ceramic -- all very easy to clean up. The predominant colors would be varying shades of ivorys/tans/browns and greens. My kitchen has English ivy wallpaper that I love with old fashioned looking lace curtains, my bathroom is a soothing, watery green, and all other walls are some shade of ivory. Most of our furniture and things either are old, or look old. Not that I am a particular antique nut, it's just that's what we have -- family pieces that are old. The furniture we purchase is always something to go with what we already have, so I guess I'd call it a mix of classic traditional and antique, but very functional. Nothing here is for show, it's all very well used. And nothing here is particularly feminine. I do have a traditional old-fashioned long front porch that I love, all done in white with large hanging baskets of flowers (during our very short summers) and many white wooden rocking chairs.
My work space -- I stamp in the basement in what was built for me as a sewing room 12 years ago, so I do have nice counters and cabinets; however, the cabinets are full of sewing supplies. I have added two individual units called pantry cabinets for my stamps and supplies and have a ton of the plastic units/drawers for accessories, etc. The cabinets and ceramic tile are all white, which brightens it up and last year we installed overhead shop lights. Not the most attractive, but they offer good lighting. I have 2 tables and can seat about 12 comfortably for classes, though I really prefer working with smaller groups of about 6. My work surfaces are usually messy and covered with anything and everything, but I do try to do one thorough clean-up each week, which is always so refreshing!!! I much prefer working on a clean and empty surface.
My work space -- I stamp in the basement in what was built for me as a sewing room 12 years ago, so I do have nice counters and cabinets; however, the cabinets are full of sewing supplies. I have added two individual units called pantry cabinets for my stamps and supplies and have a ton of the plastic units/drawers for accessories, etc. The cabinets and ceramic tile are all white, which brightens it up and last year we installed overhead shop lights. Not the most attractive, but they offer good lighting. I have 2 tables and can seat about 12 comfortably for classes, though I really prefer working with smaller groups of about 6. My work surfaces are usually messy and covered with anything and everything, but I do try to do one thorough clean-up each week, which is always so refreshing!!! I much prefer working on a clean and empty surface.
 You are so creative – you don’t just make a cards, but bags, tags and all sorts of coordinating containers – where do you come up with your ideas and how long does it take to make a project?
My ideas come from anywhere and everywhere! I have always loved a beautifully wrapped gift, and I guess my overall feeling is that presentation is everything, which leads to my love of making bags, tags and containers. My eyes are always open, and whether I'm in store, scanning a magazine, or at a friend's house, I just tuck into the back of my mind things that I find appealing and of interest -- colors, shapes, accents, accessories -- inspiration is everywhere -- just keep your eyes open!!!
And how long does it take to make a project -- well, that's a good one -- LOL!!! There are times things go very smoothly and everything just falls into place very quickly; however, there are far MORE times that things don't go so well, and it's just a matter of trial and error until I get it *right*. I have learned to never adhere anything together until I am SURE it's the way I want it. Even the layering of colors -- using the same colors, HOW you layer them can yield such differing results. I just make all my pieces and play with them until I am pleased before I adhere things together.
And how long does it take to make a project -- well, that's a good one -- LOL!!! There are times things go very smoothly and everything just falls into place very quickly; however, there are far MORE times that things don't go so well, and it's just a matter of trial and error until I get it *right*. I have learned to never adhere anything together until I am SURE it's the way I want it. Even the layering of colors -- using the same colors, HOW you layer them can yield such differing results. I just make all my pieces and play with them until I am pleased before I adhere things together.
Tell us your top three tools that you cannot do without.
No. 1 is my old style guillotine table top paper cutter with a full 12 x 12 bed with 1/2" grid lines. I love working on a gridded surface in an effort to help me keep a sense of *straight*, and I know I'm a bit obsessive about that!!! I stand at my counter in front of this paper cutter to do all my final assembly work on it.
No. 2 is a tool that is fairly new to me -- the Scor-Pal. It makes scoring so very simple and quick and I LOVE to use it for dry embossing as well. It's a tool I can't imagine doing without once having it!!!
No. 3 is a tie between my little metal 6" seam guide (a sewing tool -- it's just a small 6" ruler) and baby wipes. LOL!!! Again, my obsessiveness with *straight, square, equal*!!! I'm just a measurer, I can't help it!!! And the baby wipes -- well -- I really dislike a messy work surface, don't like ink of my fingers for fear I'll stain my project, REALLY dislike glitter floating around, etc, etc, -- so the baby wipes are something I am constantly grabbing.
What does your family think about this hobby?
Well, that depends on who you ask and when - LOL!!! Generally speaking they are very supportive, however, this hobby does take a lot of time, especially when you get involved with DT work, Blogging, etc. I am also an active Stampin' UP demo. This all takes away from family time -- there is no question about that. I try very hard to achieve a balance and, quite frankly, I am amazed at my DH's level of tolerance. He realizes how much I truly love what I do and how important it is to me. Gotta love him for that!!!
What is your favorite Flourishes Stamp and why.
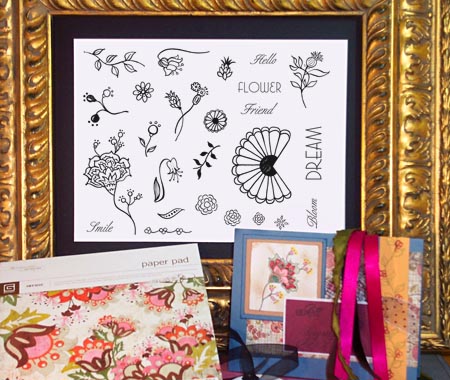
+copy.jpg) My favorite Flourishes Stamp set is Flourished Elements. It is a timeless set in a classic style that I so love!!! It has no theme, no season, no gender. It can be used on any type of project, for any type of person, for any occasion. I love it's beautiful lines and curves, I love that there is a good mix of large and small stamps in the same set, and my favorite stamp within the set is the large corner stamp. This is without a doubt my dream stamp set come true!!! I will use this set FOREVER!!! The project that I am the most excited about having made in a long, long time, is a set of 3 tall, narrow boxes I did with this set. Any project done with this set is guaranteed to be gorgeous -- this is just one of those sets you can't go wrong with!!!
My favorite Flourishes Stamp set is Flourished Elements. It is a timeless set in a classic style that I so love!!! It has no theme, no season, no gender. It can be used on any type of project, for any type of person, for any occasion. I love it's beautiful lines and curves, I love that there is a good mix of large and small stamps in the same set, and my favorite stamp within the set is the large corner stamp. This is without a doubt my dream stamp set come true!!! I will use this set FOREVER!!! The project that I am the most excited about having made in a long, long time, is a set of 3 tall, narrow boxes I did with this set. Any project done with this set is guaranteed to be gorgeous -- this is just one of those sets you can't go wrong with!!!
+copy.jpg) My favorite Flourishes Stamp set is Flourished Elements. It is a timeless set in a classic style that I so love!!! It has no theme, no season, no gender. It can be used on any type of project, for any type of person, for any occasion. I love it's beautiful lines and curves, I love that there is a good mix of large and small stamps in the same set, and my favorite stamp within the set is the large corner stamp. This is without a doubt my dream stamp set come true!!! I will use this set FOREVER!!! The project that I am the most excited about having made in a long, long time, is a set of 3 tall, narrow boxes I did with this set. Any project done with this set is guaranteed to be gorgeous -- this is just one of those sets you can't go wrong with!!!
My favorite Flourishes Stamp set is Flourished Elements. It is a timeless set in a classic style that I so love!!! It has no theme, no season, no gender. It can be used on any type of project, for any type of person, for any occasion. I love it's beautiful lines and curves, I love that there is a good mix of large and small stamps in the same set, and my favorite stamp within the set is the large corner stamp. This is without a doubt my dream stamp set come true!!! I will use this set FOREVER!!! The project that I am the most excited about having made in a long, long time, is a set of 3 tall, narrow boxes I did with this set. Any project done with this set is guaranteed to be gorgeous -- this is just one of those sets you can't go wrong with!!!Tell us something we don’t know about you, that we would be surprised to learn.
Well, probably the most unusual thing most of you wouldn't know about me is that I am a cheese maker!!! Not a professional in the dairy type of cheese maker, but an in my kitchen cheese maker. Our area has a predominance of Finnish people, and it is a Finnish cheese that I make. It is unlike most cheeses and is rather hard to describe, but it is a baked cheese, white, soft in comparison to most cheeses, referred to as *squeaky cheese* as it squeaks in your teeth when you chew it, and officially called Juustoa (pronounced *you-stew-a*, accent on the you) in Finnish. So, that's my claim to fame!!!
You can see more of Sharon's beautiful work on the Flourishes Gallery, and be sure to visit her blog, No Time to Stamp for more inspiration, techniques, and challenges.


 Then I added the darker green...accenting the lines of the wreath and the
  leaves....the wreath is just
  Again starting with the light pink I colored in all the berries.