 Hi all! It's hard to believe it's Friday already. But, with it comes another Flourishes Focus and another excuse to share with you some of our favorites with a Flourishes flair! It's Julie Koerber here! And today.... I bring you one of my favorite ways to color - Colored Pencils!
I remember one day my mother-in-law brought home some samples from a colored pencil class that she had taken at her local stamp store and I was wowed! I'd never seen anything like this and coloring? Well, I haven't given it up since I started in Kindergarten. Why stop now? The colors in my MIL's creations were vibrant - like nothing I had seen in stamping before. I asked to borrow her instructions from class so I could play in my stamp room. I've been reaching for my colored pencils ever since! I hope after taking this walk with me through my creations, you want to dabble in this medium too!
What you need to get started

- Quick dry, non-smear, permanent inks. I used Palette inks for my creations. I also used Versamark with embossing powder as well.
- A paper with "tooth". Papers that are ultra smooth really don't work well with this technique. You need something for the waxy colored pencils to grab on to - a bit of grain to hold the pigment.
- Prismacolor or Koh-i-noor pencils ~ both of these pencils are waxed based and will blend well. Both are unparalleled in what kind of color they can deliver!
- Odorless Mineral Spirits (optional and only used on the last creation) and a blending stump.
- Good art eraser (white plastic eraser--make sure it's clean each time you use it!)
- A good quality sharpener to keep your pencil points sharp.
- Your favorite Flourishes stamps!
Creation #1: Using colored pencils on dark cardstock
 When I saw the peacock in the newly released Strut Your Stuff set, I just knew that it needed to be colored up in a bold, artsy way. This is where colored pencils really shine!
I started by stamping my image with Versamark ink and embossing with copper detail embossing powder. Then, I went over the entire image with bleach. I wanted to make sure that my colors really stood out! Edited to Add: to add the bleach, I simply "painted" it on with a fine tip brush. Make sure if you like the brush to wash it out immediately or the bleach will eat the bristles!
 Then, I added white pencil where I wanted white or lighter highlights to peek through on the peacock's body and in the feathers...
 After that, I added Chartreuse over the entire base of my feathers and True Blue Prismacolor Pencils over the entire body of the peacock.
  From there, I added a bit of Light Aqua to a few spaces in the feathers. I wasn't going for a realistic look here - I wanted an "artsy" feel that featured swirls of color in the feathers.
 Next, I went over all of my feathers with my Chartreuse green to blend all of the colors a bit. TIP: If you don't want to use Odorless Mineral Spirits to blend your colors as you add them, you can actually go over the entire piece with either a lighter color pencil or a blender pencil.
  Next, I added Ultramarine to the peacock feather spots. Once you have your coloring right where you want it, it is a good idea to "seal" your work. I use what is called a Workable Fixatif by Krylon.
  Why use a sealer? It helps to bring a bit of a sheen to your work and preserves it. Because you are using pencils that are a wax base, they can produce what is called "wax bloom" over time. It's a milky white film that can form on the top of your creation. I don't know about you, but if I take the time to color my card, I don't want this white film to form on my card sometime down the road! The only advice I would have when using this spray is to make sure you are in a well ventilated area. It is a kind of lacquer and it's not good for your lungs I am sure!
 Here's another look at the finished card...
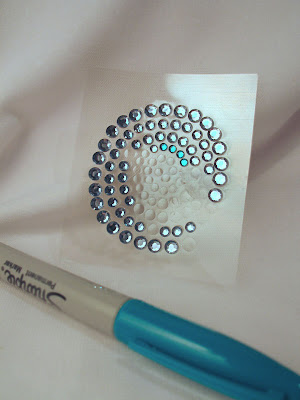
 See the bit of "bling" on the curls of the feathers? I have a fun story about those. I used THESE rhinestones and knew they wouldn't be bright enough for my creation, so I pulled out my turquoise Sharpie and changed the look of my bling in seconds!
I hope you found this tutorial helpful! The rest of the Flourishes DT picked up their colored pencils as well for this edition of the Flourishes Focus, so be sure to hop on over to their blogs to see their fabulous creations!
Christine OkkenCindy Lawrence
Faith Hofrichter
Latisha Yoast
Laura Fredrickson
Leslie Miller
For more cards using this technique and a second tutorial on other ways to use colored pencils, be sure to stop by my blog HERE.
STOP THE PRESSES! Jan Marie is headed to New Orleans as we speak to learn and play, so she asked me to showcase some of her colored pencil creations! She didn't reach for peacocks or even flowers for her cards, she decided to pick up her Rock-A-Bye set for some sweet-as-can-be baby creations -- one fit for a boy and one for a girl! Aren't they darling?

 She used Prismacolor Pencils and actually reached for her colorless blender pencil to meld the layers together and blend! I love how she used her Nesties and a Spellbinders Frame to really give her cards some extra pizazz!
Thanks for stopping by! See you back here soon!
~Julie


11 comments:
OMG! What an awesome tutorial! I am going to try that tonight but have one question! How do you keep the bleach in the area you want it?! I mean, not to blead or soak out like?!! Thank you for such an awesome tutorial!
Michelle
JeMiBre@gmail.com
OMG is right :) this was an awesome tutorial and I must try it myself. I love the idea of doing this on black, I do not own this peacock :(, but I can try with my other stamps. thanks so much for the great details.
Gorgeous Julie! I love it and the jewels are a perfect touch. Jan Marie your cards are so sweet and beautiful! Wonderful work girls!
Wow! What a great tutorial! Your steps make it look simple.
Great tutorial, Julie. I love the way the colors really show up against the black after bleaching out the color.
these cards are beautiful will have to try the bleach I have one of those bleach pens works great and I love the colored pencils
Hugs
Norine
Thank you so much, this is a very needed tutorial. The peacock is going to be my very first Flourishes stamp even though I have been stalking Flourishes for a year. I know what is wrong with me right??
Thanks again
I love tutorials!! This is wonderful too!
I don't know where else to ask this question so I hope it's ok to post here.
I just bought some soft pastel pencils and assume the technique will work with this. (?)
I have never had much luck with the colored pencils, I don't get the results like I see, so I wonder if there are levels of quality in the pencils. I have EK pencils, CTMH and Stampin up - should I be looking for a different brand??
Thanks so much, I love your stamps and blog and the site is great too!!
Patti
I just found this blog! WOW is all I can say. I can't wait to spend time searching through all the neat tutorials and try some new things and ideas when I make cards!
Monica
So vibrant!! Lovely work Julie, thanks for the tutorial. I have been using the same 60 prismacolor art pencils since i treated myself to them in university! I love them!
Wow! That peacock is suitable for framing! So lovely! Thank you for sharing this tutorial!
Post a Comment