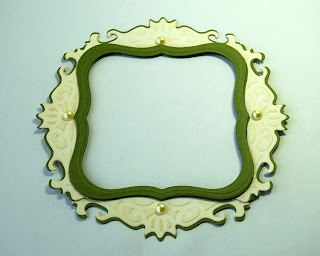
I guess it`s no secret that I love my Spellbinders dies, and I thought I`d share with you a simple way to take your dies to the "next level". This frame will show off your favorite image in a beautiful and elegant way, I think.

I used the Nasturtiums set for this card, and colored it with Distress Inks. Here is a little step by step on the frame:

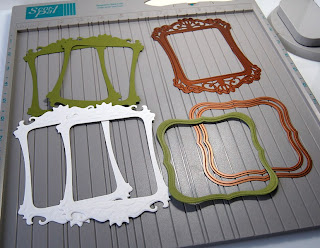
I`ve used Spellbinders Classic Frame. I cut out two white frames and two green ones. I also used the Labels One dies to create the "inner" frame.

Cut the frames as shown on the photo.

Glue the white pieces onto the green pieces as shown. Using a darker color at the back creates a shadow-effect and gives depth to the frame.

Glue the four pieces together as shown.

Attach the Labels one- frame as shown. I sponged the frame lightly with brown ink. Decorate with some Pearls, and your frame is ready to go!
Thanks so much for stopping by today! I hope you`ve found some inspiration to how you can frame your favorite images. And I sure hope to see you back here next Sunday!


33 comments:
wow...thanks for the very creative tip on using the spellbinder frames.. gorgeous card!
Fabulous card, so pretty. Thank you for the tutorial it was great to see how it's done.
OK YVONNE,
...fortunately I already own this Nest set, LOVE how you used it!
I was using an image that was larger than the NEST frame ...now I know how to make it work!
wunderschöne rahmenkarte. sieht einfach klasse aus.
lg
sanny
Yvonne, your artwork is stunning! I purchased this frame just this week! I'll definitely use your tutorial! Thanks!
Oh my this is just fabulous, I love this and can't wait to try it. Thanks so much for the tutorial.
That's pretty cool, Yvonne! Cutting the ends off the Classic Frame was inspired. And I like the green behind the white. Very nicely done. I may have to give this technique a try!
This is a stunningly beautiful card. I love spellbinders and appreciate the tip. I'm always looking for new ways to use them. Now to find the frame. Always seems to be sold out in Canada.
Beautifully done Yvonne
Beautiful, beautiful, beautiful! This is just such a stunning card Yvonne and I love the tutorial on how to make the frame! I am definitely trying this one! :-)
Wow! This is a great project. I love how you altered the frame to fit your needs. The shadowing is fabulous and gives it so much dimension. Thanks for the great step by step on how to do it.
Beeeeatuiful!! I love how you customized the frame. Your coloring and design are fabulous as well!
TFS~
ABSOLUTELY BEAUTIFUL!!! I am so glad that you accepted the offer to be a Limelight Designer. Your work is always and inspiration and that we can share it will all of our FLLC stampers makes it even better.
Jan Marie
1flourish
Aakkkk - now I HAVE to get that frame too!!! Beautiful card!!!!
Wow thanks for that demo - very useful and very pretty!!I have both of these die sets and now I shall get twice as much use out of them, thank you.
HW
Awesome tips on the Spellbinders frames, I am so using this sometime. Beautiful creativity Yvonne!
Wonderful tips and use of the Spellbinder's Frame!!! So creative and unique!
Yvonne, your framing is exquisite! TFS your wonderful tutorial. Your finished card is a beautiful piece of art that is worthy of your gorgeous framing. Can't wait for next sunday :-)
I'm truly speechless - after seeing Yvonne's work on her blog, suddenly all my cards appear dull and lame...lol
Girl, you're a gem!!
Oh, thank you, thank you! Sheesh! I have this Spellbinders set and may not have even recognized it if you hadn't shown the "how to". Filing this away in my feeble brain. I really hope to give this, or something with this concept, a try. Incredibly gorgeous, Yvonne!
TFS such a wonderful tutorial. The frame is fantastic!
This is absolutely stunning! Your frame,your colouring the entire card is a masterpiece. WOW!
What a great idea and so very pretty!
Thank you so much for sharing your technique to make this stunningly beautiful card!! I am amazed by your creations and thanks to your tutorial, can see the possibility of making something just as gorgeous myself!!
Your work is just gorgeous and I'm so glad you are in the Limelight to share it with us all. Wonderful use of the Nesties and I'm sure we will all get out the scissors and give it a try. Beautiful. Pat
Thanks for the description and pics of the frame! So neat. Beautiful colors all round. lovea!
Georgeous!
Yvonne, CONGRATULATIONS!! You are a creator extraordinaire!! You have such a beautiful inner vision and see things that the rest of us can't even imagine and you are so generous to share that with us. You just make it seem so easy. I love this gift that comes so naturally to you.
Michele (mitchygitchy)
Dang girl! You are BRILLIANT! I have that frame and never use it because it's too big! Now I see how I can use it! You are brains and talent, too! Muuuuah!
Gorgeous Yvonne! Oh I love how you create frames. Fabulous idea, will trying this!
Oh my goodness. Yvonne! This is stunning! I LOVE your pieced frame. That Spellbinder frame is now on my wishlist!
Hugs and smiles
STUNNING Yvonne!!! Your work with spellbinders and beautiful images is amazing and always inspiring!!!
I love the creative way you use Spellbinders! It really inspires me! Thanks for this easy to understand tutorial. It was so helpful! You create such beauty with paper and color!
Post a Comment